You’re reading, teach you how to make delicious homemade dishes to share with your family and friends. This pineapple upside down cake will be ready before you know it. So let’s get started.
First off, grab a nine-inch pie dish, set that oven to 350, and let’s make the base. That’s the fun part because this cake plops out fully decorated and done. It’s one of the reasons I love any upside down cake.
1/4 of a cup of unsalted butter. We’ve melted it up and it’s gonna go right into our pie dish. Swirl this around so you have a nice base of butter. It’s gonna form a glue that holds everything together. I wanna say the glue that holds my family together. Let me know in the comments if you get that reference.
Anyways, so now we have our butter over here. Now, sprinkle in that brown sugar. God, this feels so good in my hands. Baking is very tactile. Sprinkle that into an even layer. So, try to not get any big clumps. That’s all covered.
Time for the pineapples. I’m using the canned kind because it’s so easy. And they’re actually really good canned. Do not throw away that pineapple juice though. It’s good in a ton of things. In your smoothies. In a drink of any kind. You let me know in the comments what you would use the pineapple juice for. It’s even good for making rice and things like that, to add some sweetness and acidity.
Grab some paper towels, and we’re gonna pat our pineapples. We don’t want them to ooze too much, but we do want them to absorb all that caramel. So pat them, set them aside, and then once they’re all dry, we can place them onto our dish.
Place one pineapple slice directly in the center. And now we’re going to add more slices around so it’s all filled up and beautiful. Yes, that last slice will fit in right there. Now we’re gonna place our halves right on the edge. And that will just about cover our cake. Oh no, it actually does just cover the cake. That’s so crazy. This one broke, but that’ll be our secret. You won’t be able to tell. Last one in. I knew these spoons would come in handy one day.
You’re gonna place maraschino cherries all in every gap, basically. And if you want, you could pat these dry as well. It’s nice if they don’t bleed onto the pineapple for a chef’s kiss aesthetic. Now we’re gonna add maraschino cherries without the stems into all the voids. And that includes in-between the pineapples. You could squeeze some in. And for the record, I prefer Luxardo cherries, but they don’t look as pretty. You could also use a pecans in this as well. Also up here. Don’t let them fall. I think that’s it, maybe. Maybe I don’t need them right here. Nevermind. I’m not gonna put them in every space. This gets set aside.
And now we’re gonna make our really easy, but delicious batter. Into a medium bowl, I’m adding 1 1/2 cups or 180 grams of all-purpose flour, 1/2 teaspoon of salt, and 1 1/2 teaspoons of baking powder. Set that scale aside. Give it a little whisk.
And now we’re gonna make that wet ingredient situation happen. You know what? I lied. (upbeat music)
I’m taking a scale back. All right, into this bowl, I’m adding 1/2 a cup of room-temperature butter. I’m using the scale because I need 3/4 of a cup of granulated sugar. That’s 150 grams. So let’s see if I measured it correctly. I didn’t. It was over. I knew it was over. So odd.
Okay, now we’re going to cream this up until it’s nice and fluffy. It’s about three minutes. I’m using a hand mixer today, but you could definitely use a stand mixer. Mix it up, then fix your hair. (mixer whirring)
Something’s happening up here. I can feel it. So when you and mix the butter and the sugar and you get them nice and fluffy, part of the reason you’re doing that is to beat air into your cakes so it’s light and fluffy too. If you’re using the muffin method of just like melting butter, you’re not gonna get that same lightness and just wonderful crumb. I’m saying this so you don’t skimp on your mixing time.
Keep an eye on it. We’re gonna add two eggs in, one at a time, while mixing. And in case you’re wondering, you’re adding them in one at a time so you can beat some air in again. You want these to be fluffy, because these eggs are not foamed up like you would have in different cakes. Second egg. In you go. Mix it up until it is totally incorporated.
It’s time for two teaspoons of a nice vanilla. In you go. One, two. Mm. It smells so good every time. (mixer whirring)
This is all mixed up and lovely. We’re gonna set that aside because I forgot to mix up my sour cream and milk. This has 1/3 of a cup of sour cream and 1/3 of a cup of whole milk. Mix together that sour cream and milk until it is a delicious, rich concoction.
Now we’re gonna alternate this, with the flour, into our butter mixture, starting and ending with the flour. 1/3 of the dry mixture goes right in. Mix on low. If you’re wondering why you do this, it’s helping to stabilize the mixture and kind of prevent all those air bubbles from just collapsing.
All right, half of the milk-sour cream mixture. It’s okay if it’s a bit lumpy. Don’t worry. And repeat that for the remaining thirds and half. Add the remaining flour. Never gets old. Add it in. Mix on low until just combined.
Normally I finish off a batter by hand, but if you’re using a hand mixture, you like a really good feel for it. So I’m actually using it almost as a spatula that spins. (mixer whirring)
Clean those beaters off. Now, just use a spatula, scrape the bowl down, make sure there’s no errant bits of unmixed nonsense. And then we’re gonna transfer this into our pineapple cherry bowl. Get it all out. Just spread it to the edges, level it out.
Once your batter’s all leveled out, you’re gonna pop this into the oven at 350 for 40 to 45 minutes, or until the center is set. Let it cool on a wire rack before inverting it upside down. Into the oven you go.
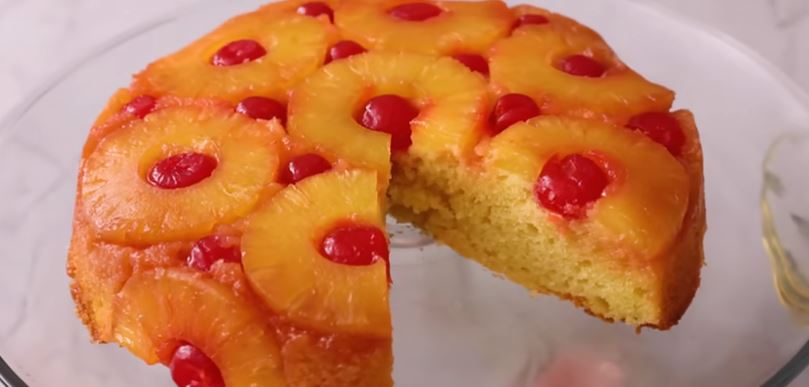
Let that cake cool in the pan for about 15 minutes, then get your cake plate or stand. And we’re gonna invert this carefully. It’s still pretty hot. Flip it upside down. Tap, tap, tap. Think some good thoughts. And we’re gonna lift this up. Oh! Look at that. Nothing stuck. This is gonna cool for about 20 minutes, then you’re gonna cut it. But right now this looks gorgeous. I wish you could smell it. Mm!
If you like this blog, check out my easy cake blogs. This cake melts in your mouth, it’s wild. And the pineapples are just so perfectly sweet with that nice touch of acid.
Why did pineapple upside-down cake become so popular?
Pineapple upside-down cake became popular largely because it was both visually striking and easy to make with readily available canned ingredients. In the early to mid-20th century, canned pineapple became widely accessible, especially in the United States, and home bakers were encouraged to use convenience foods. The idea of arranging fruit and sugar at the bottom of a pan and flipping the cake to reveal a glossy, caramelized topping made it feel impressive with relatively little effort.
It also benefited from strong promotion by companies like Dole, which published recipes and encouraged pineapple consumption. The cake’s combination of sweet caramel, soft fruit, and buttery sponge appealed to broad tastes, and its “flip-and-reveal” presentation made it a popular choice for gatherings and holidays. Over time, it became a nostalgic dessert associated with home baking and retro American cuisine.
What’s in a pineapple upside-down cake?
A traditional pineapple upside-down cake typically includes pineapple slices, brown sugar, butter, and maraschino cherries for the topping. These ingredients are placed at the bottom of the baking pan, where the sugar and butter melt together during baking to create a caramel-like glaze. Once the cake is inverted, this mixture forms the shiny, fruity top layer.
The cake batter itself is usually a simple vanilla sponge made from flour, sugar, eggs, baking powder, milk (or buttermilk), and butter or oil. Some variations add spices like cinnamon or use pineapple juice for extra flavor. When baked together, the fruit topping soaks slightly into the cake, giving it a moist texture and a sweet-tangy balance.
How far in advance should I make pineapple upside-down cake?
Pineapple upside-down cake is best made 1 day in advance or on the same day it will be served. This allows the caramelized fruit topping to set slightly while keeping the cake moist and fresh. After baking, it should be cooled for about 10–15 minutes before being inverted to ensure the topping releases cleanly.
If you need to prepare it further ahead, you can bake it up to 2 days in advance and store it covered at room temperature or in the refrigerator. However, the texture is at its best within the first 24 hours, as the fruit can start to soften the cake over time. Reheating slightly before serving can help restore its fresh-baked taste.
Ingredients:
1/4 cup unsalted butter (melted), 1/2 cup unsalted butter (room temperature), 3/4 cup granulated sugar (150 g), 1 1/2 cups all-purpose flour (180 g), 1 1/2 teaspoons baking powder, 1/2 teaspoon salt, 2 large eggs, 2 teaspoons vanilla extract, 1/3 cup sour cream, 1/3 cup whole milk, canned pineapple slices, maraschino cherries.
Additional tip:
Make sure the pineapple slices are well-patted dry before arranging them in the pan. This helps reduce excess moisture, so the caramel layer forms properly instead of becoming watery. Also, don’t rush the creaming step of butter and sugar—beating it well is what gives the cake its light, soft texture.
When inverting the cake, let it rest for about 10–15 minutes after baking, but don’t wait too long. If it cools completely in the pan, the caramel can harden and stick, making it harder to release cleanly. Running a thin knife around the edges before flipping also helps ensure a smooth release.
Notes:
This cake works best in a well-buttered pan to help the caramelized topping release easily. You can also customize it by adding pecans or using fresh pineapple, but canned pineapple is more consistent in moisture and sweetness. The cake is best served slightly warm or at room temperature for the softest texture and best flavor.
2 thoughts on “Pineapple Upside Down Cake Recipe”